Typing glyphs: Difference between revisions
No edit summary |
|||
| Line 46: | Line 46: | ||
A full list of keys that can be used to switch layouts is included in <source lang=console inline>/usr/share/X11/xkb/rules/evdev.lst</source> under the <source lang=console inline>option</source> category. | A full list of keys that can be used to switch layouts is included in <source lang=console inline>/usr/share/X11/xkb/rules/evdev.lst</source> under the <source lang=console inline>option</source> category. | ||
'''Note:''' these changes are not permanent; the user will have to select one of a myriad of methods to run the command on startup. Alternatively, if they use one of the [[wikipedia:Desktop_environment|desktop environments]] listed below, they can follow those instructions. | '''Note:''' these changes are not permanent; the user will have to select one of a myriad of methods to run the command on startup. Alternatively, if they use one of the [[wikipedia:Desktop_environment|desktop environments]] listed below, they can follow those instructions. | ||
| Line 54: | Line 53: | ||
===== GUI ===== | ===== GUI ===== | ||
Open the Activities menu; this is located in the top-left corner of a default GNOME 3 session (alternatively, use your <kbd>Super</kbd> key to open the Activities overlay): | # Open the Activities menu; this is located in the top-left corner of a default GNOME 3 session (alternatively, use your <kbd>Super</kbd> key to open the Activities overlay):<br>[[File:Gnome-kbd-setup-1.png|frameless|GNOME Keyboard Step 1: Open Activities Menu]] | ||
# Search for "startup." When the Startup Applications program is highlighted, press the <kbd>Enter</kbd> key to open it: <br>[[File:Gnome-kbd-setup-2.png|frameless|GNOME Keyboard Step 2: Search for Startup Applications]] | |||
[[File:Gnome-kbd-setup-1.png|frameless|GNOME Keyboard Step 1: Open Activities Menu]] | #Select the <kbd>Add</kbd> button on the right-hand side:<br>[[File:Gnome-kbd-setup-3.png|frameless|GNOME Keyboard Step 3: Click the <kbd>Add</kbd> button in Startup Applications window]] | ||
#Provide a name, enter your <code>setxkbmap</code> command, and click <kbd>Add</kbd> when finished:<br>[[File:Gnome-kbd-setup-4.png|frameless|GNOME Keyboard Step 4: Enter the relevant information for your command]] | |||
Search for "startup." When the Startup Applications program is highlighted, press the <kbd>Enter</kbd> key to open it: | |||
[[File:Gnome-kbd-setup-2.png|frameless|GNOME Keyboard Step 2: Search for Startup Applications]] | |||
Select the <kbd>Add</kbd> button on the right-hand side: | |||
[[File:Gnome-kbd-setup-3.png|frameless|GNOME Keyboard Step 3: Click the Add button in Startup Applications window]] | |||
Provide a name, enter your <code>setxkbmap</code> command, and click | |||
[[File:Gnome-kbd-setup-4.png|frameless|GNOME Keyboard Step 4: Enter the relevant information for your command]] | |||
===== Terminal ===== | ===== Terminal ===== | ||
Navigate to <code>~/.config/autostart</code> and create a <code>.desktop</code> with any name that will help you remember its function. | # Navigate to <code>~/.config/autostart</code> and create a <code>.desktop</code> with any name that will help you remember its function. | ||
# Add the following to the contents of your file, customizing to suit your needs:<source lang=ini> | |||
Add the following to the contents of your file, customizing to suit your needs: | |||
<source lang=ini> | |||
[Desktop Entry] | [Desktop Entry] | ||
Type=Application | Type=Application | ||
| Line 91: | Line 76: | ||
==== LXDE ==== | ==== LXDE ==== | ||
Prepend an <source lang=console inline>@</source> to the <source lang=console inline>setxkbmap</source> command from above | # Prepend an <source lang=console inline>@</source> to the <source lang=console inline>setxkbmap</source> command from above:<br><source lang=console> | ||
<source lang=console> | |||
@setxkbmap -layout us,apl -variant ,dyalog -option grp:switch | @setxkbmap -layout us,apl -variant ,dyalog -option grp:switch | ||
</source> | </source> | ||
# Add it as a line in your user's LXDE <source lang=console inline>autostart</source> file, located at:<br><source lang=console> | |||
<source lang=console> | |||
~/.config/lxsession/LXDE/autostart | ~/.config/lxsession/LXDE/autostart | ||
</source> | </source> | ||
| Line 109: | Line 89: | ||
===== GUI ===== | ===== GUI ===== | ||
From your LXQt panel, navigate to ''Preferences'' → ''LXQt Settings'' → ''Session Settings''; alternatively, enter <source lang=console inline>lxqt-config-session</source> in your terminal emulator. You will be greeted with the following window: | # From your LXQt panel, navigate to ''Preferences'' → ''LXQt Settings'' → ''Session Settings''; alternatively, enter <source lang=console inline>lxqt-config-session</source> in your terminal emulator. You will be greeted with the following window:<br>[[File:Lxqt-session-settings.png|frameless|LXQt Autostart menu of Session Settings window]] | ||
# Select the <source lang=console inline>LXQt Autostart</source> dropdown (it will be highlighted as shown above) and click the <kbd>Add</kbd> button to display the following pop-up window:<br>[[File:Lxqt-add-autostart.png|frameless|LXQt add a new autostart menu item]] | |||
[[File:Lxqt-session-settings.png|frameless|LXQt Autostart menu of Session Settings window]] | # Provide a name, enter your <code>setxkbmap</code> command, and click <kbd>OK</kbd> when finished. | ||
Select the <source lang=console inline>LXQt Autostart</source> dropdown (it will be highlighted as shown above) and click the <kbd>Add</kbd> button to display the following pop-up window: | |||
[[File:Lxqt-add-autostart.png|frameless|LXQt add a new autostart menu item]] | |||
Provide a name, enter your <code>setxkbmap</code> command, and click | |||
===== Terminal ===== | ===== Terminal ===== | ||
| Line 136: | Line 110: | ||
===== GUI ===== | ===== GUI ===== | ||
Open your MATE menu (in the top-left corner of a default environment) and select ''Control Center'' at the bottom of the window: | # Open your MATE menu (in the top-left corner of a default environment) and select ''Control Center'' at the bottom of the window:<br>[[File:Mate-kbb-setup-1.png|frameless|Launch the Control Center from the MATE menu]] | ||
# Scroll down through the main window, and under the ''Personal'' category, select ''Startup Applications'':<br>[[File:Mate-kbb-setup-2.png|frameless|Scroll down to the Startup Applications option]] | |||
[[File:Mate-kbb-setup-1.png|frameless|Launch the Control Center from the MATE menu]] | # Click the <kbd>Add</kbd> button on the right-hand side:<br>[[File:Mate-kbb-setup-3.png|frameless|Click <kbd>Add</kbd> to add a new startup command]] | ||
# Provide a name, enter your <code>setxkbmap</code> command, and click <kbd>Add</kbd> when finished:<br>[[File:Mate-kbb-setup-4.png|frameless|Enter the setxkbmap command you wish to use]] | |||
Scroll down through the main window, and under the ''Personal'' category, select ''Startup Applications'': | |||
[[File:Mate-kbb-setup-2.png|frameless|Scroll down to the Startup Applications option]] | |||
Click the <kbd>Add</kbd> button on the right-hand side: | |||
[[File:Mate-kbb-setup-3.png|frameless|Click | |||
Provide a name, enter your <code>setxkbmap</code> command, and click | |||
[[File:Mate-kbb-setup-4.png|frameless|Enter the setxkbmap command you wish to use]] | |||
===== Terminal ===== | ===== Terminal ===== | ||
| Line 224: | Line 187: | ||
=== ASCII symbol combination === | === ASCII symbol combination === | ||
* Many APL glyphs can be approximated by overlaying or juxtaposing two ASCII characters. [[ngn/apl]]'s scripted demo interface and [https://abrudz.github.io/lb/apl Adám Brudzewsky's in-browser language bar] allow such a pair of characters and hitting the | * Many APL glyphs can be approximated by overlaying or juxtaposing two ASCII characters. [[ngn/apl]]'s scripted demo interface and [https://abrudz.github.io/lb/apl Adám Brudzewsky's in-browser language bar] allow such a pair of characters and hitting the <kbd>Tab↹</kbd> key to replace them with the corresponding APL character. For example, <kbd><</kbd>,<kbd>-</kbd>,<kbd>Tab↹</kbd> will insert <source lang=apl inline>←</source> and <kbd>T</kbd>,<kbd>o</kbd>,<kbd>Tab↹</kbd> will insert <source lang=apl inline>⍕</source>. | ||
[[File:NARS2000 language bar.png|thumb|right|NARS2000 language bar]] | [[File:NARS2000 language bar.png|thumb|right|NARS2000 language bar]] | ||
Revision as of 09:13, 15 May 2020
APL uses a large range of special graphic symbols to represent most functions and operators. While keyboard mappings become memorized over time, entering APL characters can frustrate the beginner. However, a study involving high school students found that typing and using APL characters did not hinder the students in any measurable way. There are several convenient ways to enter the glyphs.
How to Set up an APL Keyboard
Text editors
Keyboard layout extensions exist for several popular text editors like VS Code, Emacs and Vim. This can be an alternative, or complementary, to system-wide settings.
Web
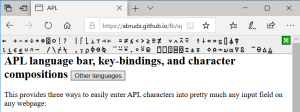
Adám Brudzewsky's in-browser language bar adds APL keyboard functionality to most web pages on demand.
Windows
- Adám Brudzewsky's keyboard layouts for Windows, which uses AltGr.
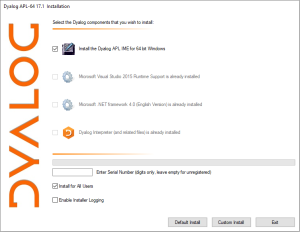
- The Dyalog Unicode IME uses Ctrl. It is also possible to install the IME alongside a regular Dyalog APL installation:
Android
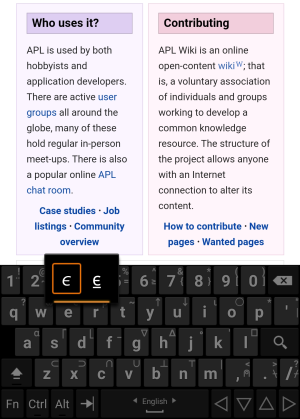
dzaima's Hacker's Keyboard + APL language uses a long-press to access APL glyphs.
Linux
Geoff Streeter authored a paper, Supporting APL keyboards on Linux, which was presented at the Dyalog '10 user meeting. In this paper, Geoff details how APL keyboards can be supported in X11 using xkb, the X Keyboard Extension.
Most Linux distributions released after mid-2012 have Dyalog keyboard support included with the distribution.
setxkbmap
The simplest way to set up an APL keyboard on Linux is with the following setxkbmap command. Enter the following in your terminal emulator of choice:
setxkbmap -layout us,apl -variant ,dyalog -option grp:switch
An explanation:
-layout us,aplassignsus(U.S. English) to be the primary layout, whereasaplis secondary
-option grp:switchassigns Right Alt to switch to the secondaryapllayout when it is pressed, otherwiseusis used
-variant ,dyalogassigns the Dyalog APL variant to theapllayout which contains modifiations unique to the Dyalog language (Note the preceding comma)
A full list of keys that can be used to switch layouts is included in /usr/share/X11/xkb/rules/evdev.lst under the option category.
Note: these changes are not permanent; the user will have to select one of a myriad of methods to run the command on startup. Alternatively, if they use one of the desktop environments listed below, they can follow those instructions.
GNOME
GUI
- Open the Activities menu; this is located in the top-left corner of a default GNOME 3 session (alternatively, use your Super key to open the Activities overlay):

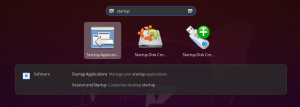
- Search for "startup." When the Startup Applications program is highlighted, press the Enter key to open it:
- Select the Add button on the right-hand side:
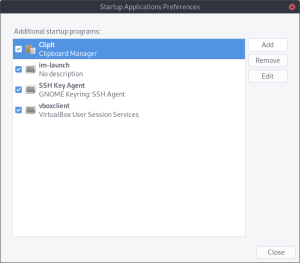
- Provide a name, enter your
setxkbmapcommand, and click Add when finished: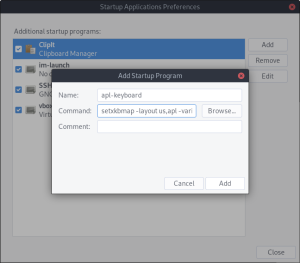
Terminal
- Navigate to
~/.config/autostartand create a.desktopwith any name that will help you remember its function. - Add the following to the contents of your file, customizing to suit your needs:
[Desktop Entry]
Type=Application
Exec=setxkbmap -layout us,apl -variant ,dyalog -option grp:switch
Hidden=false
NoDisplay=false
X-GNOME-Autostart-enabled=true
Name[en_US]=apl-keyboard
Name=apl-keyboard
Comment[en_US]=
Comment=
LXDE
- Prepend an
@to thesetxkbmapcommand from above:@setxkbmap -layout us,apl -variant ,dyalog -option grp:switch
- Add it as a line in your user's LXDE
autostartfile, located at:~/.config/lxsession/LXDE/autostart
For Lubuntu versions up to and including 18.04 (before the LXQt split), the location of autostart is ~/.config/lxsession/Lubuntu/autostart.
LXQt
GUI
- From your LXQt panel, navigate to Preferences → LXQt Settings → Session Settings; alternatively, enter
lxqt-config-sessionin your terminal emulator. You will be greeted with the following window: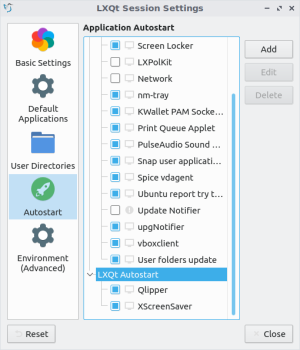
- Select the
LXQt Autostartdropdown (it will be highlighted as shown above) and click the Add button to display the following pop-up window: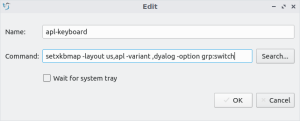
- Provide a name, enter your
setxkbmapcommand, and click OK when finished.
Terminal
The above GUI approach merely creates a .desktop file in the user's ~/.config/autostart. Create your own file in the autostart directory whose contents are as follows, to replicate the functionality achieved through the GUI:
[Desktop Entry]
Exec=setxkbmap -layout us,apl -variant ,dyalog -option grp:switch
Name=apl-keyboard
OnlyShowIn=LXQt;
Type=Application
Version=1.0
MATE
GUI
- Open your MATE menu (in the top-left corner of a default environment) and select Control Center at the bottom of the window:
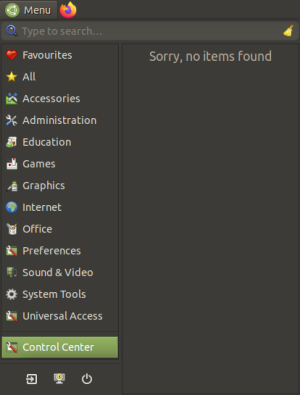
- Scroll down through the main window, and under the Personal category, select Startup Applications:
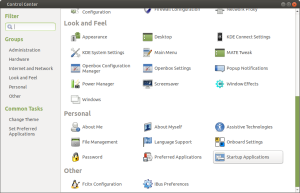
- Click the Add button on the right-hand side:
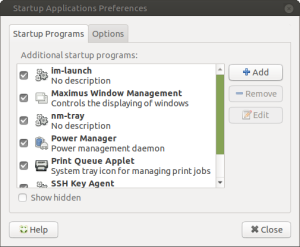
- Provide a name, enter your
setxkbmapcommand, and click Add when finished: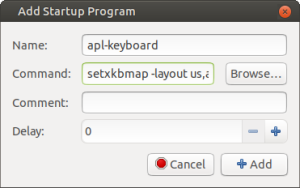
Terminal
Navigate to ~/.config/autostart and create a .desktop with any name that will help you remember its function.
Add the following to the contents of your file, customizing to suit your needs:
[Desktop Entry]
Type=Application
Exec=setxkbmap -layout us,apl -variant ,dyalog -option grp:switch
Hidden=false
X-MATE-Autostart-enabled=true
Name[en_US]=apl-keyboard
Name=apl-keyboard
Comment[en_US]=
Comment=
X-MATE-Autostart-Delay=0
Xfce
A tutorial specific to Xfce's config files can be found at this GitHub repository.
Approaches to Layout and Input
Most of today's APLs use a mapping which derives from the original APL\360 terminals' keyboard layout. For example, Dyalog APL's standard US English layout for is as follows:
┌────┬────┬────┬────┬────┬────┬────┬────┬────┬────┬────┬────┬────┬─────────┐
│~ ⌺ │! ⌶ │@ ⍫ │# ⍒ │$ ⍋ │% ⌽ │^ ⍉ │& ⊖ │* ⍟ │( ⍱ │) ⍲ │_ ! │+ ⌹ │Backspace│
│` ⋄ │1 ¨ │2 ¯ │3 < │4 ≤ │5 = │6 ≥ │7 > │8 ≠ │9 ∨ │0 ∧ │- × │= ÷ │         │
├────┴──┬─┴──┬─┴──┬─┴──┬─┴──┬─┴──┬─┴──┬─┴──┬─┴──┬─┴──┬─┴──┬─┴──┬─┴──┬──────┤
│Tab    │Q   │W   │E ⍷ │R   │T ⍨ │Y   │U   │I ⍸ │O ⍥ │P ⍣ │{ ⍞ │} ⍬ │| ⊣   │
│       │q ? │w ⍵ │e ∊ │r ⍴ │t ~ │y ↑ │u ↓ │i ⍳ │o ○ │p * │[ ← │] → │\ ⊢   │
├───────┴┬───┴┬───┴┬───┴┬───┴┬───┴┬───┴┬───┴┬───┴┬───┴┬───┴┬───┴┬───┴──────┤
│Caps    │A   │S   │D   │F   │G   │H   │J ⍤ │K ⌸ │L ⌷ │: ≡ │" ≢ │Enter     │
│Lock    │a ⍺ │s ⌈ │d ⌊ │f _ │g ∇ │h ∆ │j ∘ │k ' │l ⎕ │; ⍎ │' ⍕ │          │
├────────┴──┬─┴──┬─┴──┬─┴──┬─┴──┬─┴──┬─┴──┬─┴──┬─┴──┬─┴──┬─┴──┬─┴──────────┤
│Shift      │Z ⊆ │X   │C   │V   │B   │N   │M   │< ⍪ │> ⍙ │? ⍠ │Shift       │
│           │z ⊂ │x ⊃ │c ∩ │v ∪ │b ⊥ │n ⊤ │m | │, ⍝ │. ⍀ │/ ⌿ │            │
└───────────┴────┴────┴────┴────┴────┴────┴────┴────┴────┴────┴────────────┘
Additional charts for other layouts are available.
There are multiple ways to access the glyphs associated with a particular key.
Shifting key
It is quite common to use Ctrl or Alt or AltGr (right-side Alt) as an additional shifting key. For example, AltGr+AltGr+4 would give ≤ while AltGr+Shift+4 would give ⍋.
- The Dyalog Unicode IME uses Ctrl
- NARS2000 uses Alt
- APLX uses AltGr with an option to also use Alt
Prefix key
A prefix key is a special key or character which is entered immediately before typing the corresponding key.
- The Dyalog Unicode IME and the Dyalog RIDE (Remote Integrated Development Environment) uses ` by default, but allows choosing any key as prefix key.
- Adám Brudzewsky's in-browser language bar recognises all the following as prefix keys: `, ½, ², ^,
º, §, ù, µ, °.
Keyword look-up
- The Dyalog RIDE (Remote Integrated Development Environment) allows hitting the prefix key (` by default, but configurable) twice, followed by the (beginning of the) name of a symbol or a functionality. It then displays a drop-down of choices with arrow keys to indicate choice and the Tab key to insert the symbol. E.g. `,`,d,i,v,Tab↹ inserts
÷.
ASCII symbol combination
- Many APL glyphs can be approximated by overlaying or juxtaposing two ASCII characters. ngn/apl's scripted demo interface and Adám Brudzewsky's in-browser language bar allow such a pair of characters and hitting the Tab↹ key to replace them with the corresponding APL character. For example, <,-,Tab↹ will insert
←and T,o,Tab↹ will insert⍕.
On-screen language bar
Several APL IDEs allow the display of a toolbar with a button for each APL glyph:
- Dyalog APL, NARS2000, APL2 and ngn/apl's scripted demo interface all have this feature.
Hardware
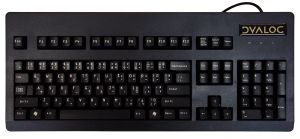
A couple of keyboards are being sold with APL symbols pre-printed onto the key caps:
- Dyalog sells US English, UK English, and Danish keyboards.
- Unicomp sells both entire keyboards and separate key caps for their keyboard range.
| APL development [edit] | |
|---|---|
| Interface | Session ∙ Typing glyphs (on Linux) ∙ Fonts ∙ Text editors |
| Publications | Introductions ∙ Learning resources ∙ Simple examples ∙ Advanced examples ∙ Mnemonics ∙ ISO 8485:1989 ∙ ISO/IEC 13751:2001 ∙ A Dictionary of APL ∙ Case studies ∙ Documentation suites ∙ Books ∙ Papers ∙ Videos ∙ APL Quote Quad ∙ Vector journal ∙ Terminology (Chinese, German) ∙ Neural networks ∙ Error trapping with Dyalog APL (in forms) |
| Sharing code | Backwards compatibility ∙ APLcart ∙ APLTree ∙ APL-Cation ∙ Dfns workspace ∙ Tatin ∙ Cider |
| Implementation | Resources ∙ Open-source ∙ Magic function ∙ Performance ∙ APL hardware |
| Developers | Timeline of corporations ∙ APL2000 ∙ Dyalog ∙ IBM ∙ IPSA ∙ STSC |
| APL glyphs [edit] | |
|---|---|
| Information | Glyph ∙ Typing glyphs (on Linux) ∙ Unicode ∙ Fonts ∙ Mnemonics ∙ Overstrikes ∙ Migration level |
| Individual glyphs | Jot (∘) ∙ Right Shoe (⊃) ∙ Up Arrow (↑) ∙ Zilde (⍬) ∙ High minus (¯) ∙ Dot (.) ∙ Del (∇)
|
