Typing glyphs on Linux: Difference between revisions
(Add Xfce keyboard tutorial to the wiki instead of linking to external GitHub repository. Tutorial now uses xfconf-query, which is the idiomatic method (instead of manually editing the XML config files)) |
|||
| (24 intermediate revisions by 8 users not shown) | |||
| Line 1: | Line 1: | ||
Since mid-2012, most Linux distributions with [[wikipedia:X_Window_System|X11]] have [[Dyalog APL]] keyboard support included with the distribution,<ref>[[Dyalog]] [[Forums]]. [https://forums.dyalog.com/viewtopic.php?f=20&t=210 Keyboard setup on Linux]. Sep 21, 2010.</ref> using < | :''This article is specific for Linux. For Hardware and other platforms, see [[Typing glyphs]].'' | ||
Since mid-2012, most Linux distributions with [[wikipedia:X_Window_System|X11]] and [[wikipedia:Wayland_(display_server_protocol)|Wayland]] have [[Dyalog APL]] keyboard support included with the distribution,<ref>[[Dyalog]] [[Forums]]. [https://forums.dyalog.com/viewtopic.php?f=20&t=210 Keyboard setup on Linux]. Sep 21, 2010.</ref> using <syntaxhighlight lang=console inline>xkb</syntaxhighlight>, the [https://www.x.org/wiki/XKB/ X Keyboard Extension].<ref name="Dyalog APL XKB">[[Geoff Streeter]]. [https://www.dyalog.com/uploads/conference/dyalog10/presentations/P19_Streeter_Keyboards.pdf Supporting APL keyboards on Linux]. [[Dyalog '10]].</ref> | |||
== setxkbmap == | == setxkbmap == | ||
The simplest way to set up an APL keyboard on Linux is with the following < | The simplest way to set up an APL keyboard on Linux is with the following <syntaxhighlight lang=console inline>setxkbmap</syntaxhighlight> command. Enter the following in your terminal emulator of choice: | ||
< | <syntaxhighlight lang=console> | ||
setxkbmap -layout us,apl -variant ,dyalog -option grp:switch | setxkbmap -layout us,apl -variant ,dyalog -option grp:switch | ||
</ | </syntaxhighlight> | ||
An explanation: | An explanation: | ||
* < | * <syntaxhighlight lang=console inline>-layout us,apl</syntaxhighlight> assigns <syntaxhighlight lang=console inline>us</syntaxhighlight> ([[wikipedia:American_English|U.S. English]]) to be the primary layout, whereas <syntaxhighlight lang=console inline>apl</syntaxhighlight> is secondary | ||
* <syntaxhighlight lang=console inline>-option grp:switch</syntaxhighlight> assigns <kbd>Right Alt</kbd> to switch to the secondary <syntaxhighlight lang=console inline>apl</syntaxhighlight> layout when it is pressed, otherwise <syntaxhighlight lang=console inline>us</syntaxhighlight> is used | |||
* <syntaxhighlight lang=console inline>-variant ,dyalog</syntaxhighlight> assigns the [[Dyalog APL]] variant to the <syntaxhighlight lang=console inline>apl</syntaxhighlight> layout which contains modifiations unique to the Dyalog language ('''Note the preceding comma''') | |||
A full list of keys that can be used to switch layouts is included in <syntaxhighlight lang=console inline>/usr/share/X11/xkb/rules/evdev.lst</syntaxhighlight> under the <syntaxhighlight lang=console inline>option</syntaxhighlight> category. | |||
Note: | |||
* These changes are not permanent; the user will have to select one of a myriad of methods to run the command on startup. Alternatively, if they use one of the [[wikipedia:Desktop_environment|desktop environments]] listed below, they can follow those instructions. | |||
* If you want to specify a different language, say for United Kingdom, specify <syntaxhighlight lang=console inline>gb</syntaxhighlight> instead of <syntaxhighlight lang=console inline>us</syntaxhighlight> (not <syntaxhighlight lang=console inline>uk</syntaxhighlight>) | |||
* If you want to specify a different layout, dvorak, bepo, etc, change the variant flag to <syntaxhighlight lang=console inline>dvorak,dyalog</syntaxhighlight>. | |||
=== NixOS === | |||
Adding these entries to <code>/etc/nixos/configuration.nix</code> will setup xkbmap to work correctly after the next time you build your configuration (usually with <code>nixos-rebuild switch</code>). | |||
<syntaxhighlight lang=console> | |||
services.xserver = { | |||
layout = "cn,apl"; | |||
xkbVariant = ",dyalog"; | |||
xkbOptions = "grp:switch"; | |||
}; | |||
</syntaxhighlight> | |||
== libinput == | |||
X11 and Wayland use XKB rules to determine their layout. To set a layout create a file called <syntaxhighlight lang=console inline>00-keyboard.conf</syntaxhighlight> at <syntaxhighlight lang=console inline>/etc/X11/xorg.conf.d</syntaxhighlight> or <syntaxhighlight lang=console inline>/usr/etc/X11/corg.conf.d</syntaxhighlight>, ensuring you have permissions, and edit it to: | |||
<syntaxhighlight lang=console> | |||
Section "InputClass" | |||
Identifier "system-keyboard" | |||
MatchIsKeyboard "on" | |||
Option "XkbLayout" "us,apl" | |||
Option "XkbVariant" ",dyalog" | |||
Option "XkbOptions" "grp:switch" | |||
EndSection | |||
</syntaxhighlight> | |||
The options "us,apl", ",dyalog", and "grp:switch" are the same as in [[#setxkbmap|setxkbmap]] and can be changed to better suit your environment. | |||
Once saved this will affect any future session. To change the current session and test out layouts, use <syntaxhighlight lang=console inline>setxkbmap</syntaxhighlight>. | |||
== GNOME == | == GNOME == | ||
| Line 33: | Line 69: | ||
# Navigate to <code>~/.config/autostart</code> and create a <code>.desktop</code> with any name that will help you remember its function. | # Navigate to <code>~/.config/autostart</code> and create a <code>.desktop</code> with any name that will help you remember its function. | ||
# Add the following to the contents of your file, customizing to suit your needs:< | # Add the following to the contents of your file, customizing to suit your needs:<syntaxhighlight lang=ini> | ||
[Desktop Entry] | [Desktop Entry] | ||
Type=Application | Type=Application | ||
| Line 44: | Line 80: | ||
Comment[en_US]= | Comment[en_US]= | ||
Comment= | Comment= | ||
</ | </syntaxhighlight> | ||
== LXDE == | == LXDE == | ||
# Prepend an < | # Prepend an <syntaxhighlight lang=console inline>@</syntaxhighlight> to the <syntaxhighlight lang=console inline>setxkbmap</syntaxhighlight> command from above:<br><syntaxhighlight lang=console> | ||
@setxkbmap -layout us,apl -variant ,dyalog -option grp:switch | @setxkbmap -layout us,apl -variant ,dyalog -option grp:switch | ||
</ | </syntaxhighlight> | ||
# Add it as a line in your user's LXDE < | # Add it as a line in your user's LXDE <syntaxhighlight lang=console inline>autostart</syntaxhighlight> file, located at:<br><syntaxhighlight lang=console> | ||
~/.config/lxsession/LXDE/autostart | ~/.config/lxsession/LXDE/autostart | ||
</ | </syntaxhighlight> | ||
For Lubuntu versions up to and including 18.04 (before the LXQt split), the location of < | For Lubuntu versions up to and including 18.04 (before the LXQt split), the location of <syntaxhighlight lang=console inline>autostart</syntaxhighlight> is <syntaxhighlight lang=console inline>~/.config/lxsession/Lubuntu/autostart</syntaxhighlight>. | ||
== LXQt == | == LXQt == | ||
| Line 61: | Line 97: | ||
=== GUI === | === GUI === | ||
# From your LXQt panel, navigate to ''Preferences'' → ''LXQt Settings'' → ''Session Settings''; alternatively, enter < | # From your LXQt panel, navigate to ''Preferences'' → ''LXQt Settings'' → ''Session Settings''; alternatively, enter <syntaxhighlight lang=console inline>lxqt-config-session</syntaxhighlight> in your terminal emulator. You will be greeted with the following window:<br>[[File:Lxqt-session-settings.png|frameless|LXQt Autostart menu of Session Settings window]] | ||
# Select the < | # Select the <syntaxhighlight lang=console inline>LXQt Autostart</syntaxhighlight> dropdown (it will be highlighted as shown above) and click the <kbd>Add</kbd> button to display the following pop-up window:<br>[[File:Lxqt-add-autostart.png|frameless|LXQt add a new autostart menu item]] | ||
# Provide a name, enter your <code>setxkbmap</code> command, and click <kbd>OK</kbd> when finished. | # Provide a name, enter your <code>setxkbmap</code> command, and click <kbd>OK</kbd> when finished. | ||
=== Terminal === | === Terminal === | ||
The above GUI approach merely creates a < | The above GUI approach merely creates a <syntaxhighlight lang=console inline>.desktop</syntaxhighlight> file in the user's <syntaxhighlight lang=console inline>~/.config/autostart</syntaxhighlight>. Create your own file in the <syntaxhighlight lang=console inline>autostart</syntaxhighlight> directory whose contents are as follows, to replicate the functionality achieved through the GUI: | ||
< | <syntaxhighlight lang=ini> | ||
[Desktop Entry] | [Desktop Entry] | ||
Exec=setxkbmap -layout us,apl -variant ,dyalog -option grp:switch | Exec=setxkbmap -layout us,apl -variant ,dyalog -option grp:switch | ||
| Line 76: | Line 112: | ||
Type=Application | Type=Application | ||
Version=1.0 | Version=1.0 | ||
</ | </syntaxhighlight> | ||
== MATE == | == MATE == | ||
| Line 93: | Line 129: | ||
Add the following to the contents of your file, customizing to suit your needs: | Add the following to the contents of your file, customizing to suit your needs: | ||
< | <syntaxhighlight lang=ini> | ||
[Desktop Entry] | [Desktop Entry] | ||
Type=Application | Type=Application | ||
| Line 104: | Line 140: | ||
Comment= | Comment= | ||
X-MATE-Autostart-Delay=0 | X-MATE-Autostart-Delay=0 | ||
</source | </syntaxhighlight> | ||
== Wayland == | |||
Currently, [https://en.wikipedia.org/wiki/Wayland_%28display_server_protocol%29 Wayland] uses [https://www.x.org/wiki/XKB/ XKB] for keyboards, but they are not modifiable during runtime using e.g. <code lang=console>setxkbmap</code> by default. The keyboard layout must be configured and then the session restarted. | |||
=== Raspberry Pi "Bookworm" onwards === | |||
Raspbian OS has moved to its own Wayland-based desktop environment "LXDE-pi-wayfire" in Bookworm. | |||
You can check that this is your currently running environment by inspecting the <syntaxhighlight lang=console inline>DESKTOP_SESSION</syntaxhighlight> environment variable. | |||
<syntaxhighlight lang=console> | |||
echo $DESKTOP_SESSION | |||
</syntaxhighlight> | |||
The current user can modify their keyboard configuration using XKB options by editing the file <syntaxhighlight lang=console inline>~/.config/wayfire.ini</syntaxhighlight>. These options take effect while using the graphical desktop environment. | |||
Under the <syntaxhighlight lang=console inline>[input]</syntaxhighlight> section, set | |||
<syntaxhighlight lang=console> | |||
xkb_layout = gb,apl | |||
xkb_options = grp:lswitch | |||
</syntaxhighlight> | |||
to use the UK keyboard layout with a <kbd>Left Alt</kbd> APL shifting key. See the [[#setxkbmap|section on setxkbmap]] for more information about XKB keyboard configuration. | |||
To set the keyboard configuration for use in the terminal console outside of the Wayland GUI, modify <syntaxhighlight lang=console inline>/etc/default/keyboard</syntaxhighlight> to include: | |||
<syntaxhighlight lang=console> | |||
XKBLAYOUT="gb,apl" | |||
XKBOPTIONS="grp:switch" | |||
</syntaxhighlight> | |||
=== GNOME Tweaks === | |||
The [https://wiki.gnome.org/Apps/Tweaks Tweaks] tool allows configuration beyond the defaults enabled in GNOME. | |||
# Install GNOME Tweaks using [https://wiki.debian.org/Apt apt] or [https://fedoraproject.org/wiki/DNF dnf], or by searching your distribution's Software Center. | |||
# Start GNOME Tweaks by either: | |||
## Using a terminal, type <code lang=console>gnome-tweaks</code> and press <kbd>Enter</kbd>. | |||
## Using the GUI: | |||
### Open the Activities menu; this is located in the top-left corner of a default GNOME 3 session (alternatively, use your <kbd>Super</kbd> key to open the Activities overlay):<br>[[File:Gnome-kbd-setup-1.png|frameless|Wayland Keyboard set up with GNOME Tweaks Step 2.1: Open Activities Menu]] | |||
### Search for "Tweaks"<br>[[File:GnomeTweaks.png|frameless|200px|Wayland Keyboard set up with GNOME Tweaks Step 2.2: Start GNOME Tweaks]] | |||
# Open Keyboard & Mouse Panel and enable "Show Extended Input Sources" <br>[[File:GnomeTweaksKeyboards.png|frameless|600px|Wayland Keyboard set up with GNOME Tweaks Step 3: Open Keyboard & Mouse Panel]] | |||
# Open the Additional Layout Options and tick one or more of the options under "Switching to another layout"<br>[[File:GnomeTweaksKeyboardsAdditional.png|frameless|350px|Wayland Keyboard set up with GNOME Tweaks Step 4: Open Additional Layout Options]] | |||
# Go to Settings → Region & Language → Add a new input source. Both English (United Kingdom) and English (United States) will have several APL layout options to choose from. | |||
# Restart the session (for example, by logging out and logging in again). | |||
== Xfce == | == Xfce == | ||
| Line 112: | Line 192: | ||
Xfce ships with a utility, [https://docs.xfce.org/xfce/xfconf/xfconf-query xfconf-query], which allows you to manage Xfce's XML configuration files on the command line. Enter the following commands into your terminal: | Xfce ships with a utility, [https://docs.xfce.org/xfce/xfconf/xfconf-query xfconf-query], which allows you to manage Xfce's XML configuration files on the command line. Enter the following commands into your terminal: | ||
< | <syntaxhighlight lang=console> | ||
xfconf-query -c keyboard-layout -n -p '/Default/XkbDisable' -t 'bool' -s 'false' | xfconf-query -c keyboard-layout -n -p '/Default/XkbDisable' -t 'bool' -s 'false' | ||
</ | </syntaxhighlight> | ||
This enables [https://www.x.org/wiki/XKB/ XKB], allowing us to manage our keyboard layout. | This enables [https://www.x.org/wiki/XKB/ XKB], allowing us to manage our keyboard layout. | ||
< | <syntaxhighlight lang=console> | ||
xfconf-query -c keyboard-layout -n -p '/Default/XkbLayout' -t 'string' -s 'us,apl' | xfconf-query -c keyboard-layout -n -p '/Default/XkbLayout' -t 'string' -s 'us,apl' | ||
</ | </syntaxhighlight> | ||
Defines the keyboard layout itself. The comma-delimited <code>apl</code> specifies a second layout group. Make sure you replace <code>us</code> with the code for your language; a list of these can be found in <code>/usr/share/X11/xkb/rules/evdev.lst</code>, under the <code>layout</code> category. | Defines the keyboard layout itself. The comma-delimited <code>apl</code> specifies a second layout group. Make sure you replace <code>us</code> with the code for your language; a list of these can be found in <code>/usr/share/X11/xkb/rules/evdev.lst</code>, under the <code>layout</code> category. | ||
< | <syntaxhighlight lang=console> | ||
xfconf-query -c keyboard-layout -n -p '/Default/XkbOptions/Group' -t 'string' -s 'grp:win_switch' | xfconf-query -c keyboard-layout -n -p '/Default/XkbOptions/Group' -t 'string' -s 'grp:win_switch' | ||
</ | </syntaxhighlight> | ||
This tells Xfce to switch to the APL layout only when the <kbd>Windows</kbd> key is pressed. When the <kbd>Windows</kbd> key is released, the layout will return to its previous setting. This is incredibly useful as the <code>apl</code> layouts in XKB do not support <kbd>Space</kbd>, <kbd>Enter</kbd>, or the arrow keys (among basically all the others). A full list of possible keys for switching between keyboard groups is located in <code>/usr/share/X11/xkb/rules/evdev.lst</code>, under the <code>option</code> category. | This tells Xfce to switch to the APL layout only when the <kbd>Windows</kbd> key is pressed. When the <kbd>Windows</kbd> key is released, the layout will return to its previous setting. This is incredibly useful as the <code>apl</code> layouts in XKB do not support <kbd>Space</kbd>, <kbd>Enter</kbd>, or the arrow keys (among basically all the others). A full list of possible keys for switching between keyboard groups is located in <code>/usr/share/X11/xkb/rules/evdev.lst</code>, under the <code>option</code> category. | ||
< | <syntaxhighlight lang=console> | ||
xfconf-query -c keyboard-layout -n -p '/Default/XkbVariant' -t 'string' -s ',dyalog' | xfconf-query -c keyboard-layout -n -p '/Default/XkbVariant' -t 'string' -s ',dyalog' | ||
</ | </syntaxhighlight> | ||
Specifies that the variant applies to the second layout, <code>apl</code>, due to the preceding comma. The <code>dyalog</code> variant is unique to [[Dyalog]]. | Specifies that the variant applies to the second layout, <code>apl</code>, due to the preceding comma. The <code>dyalog</code> variant is unique to [[Dyalog]]. | ||
And you're done! Try holding down the Windows key and pressing <kbd>H</kbd> on your keyboard — you should see a <code>∆</code>. | And you're done! Try holding down the Windows key and pressing <kbd>H</kbd> on your keyboard — you should see a <code>∆</code>. | ||
== xmodmap == | |||
Modifying the Linux keyboard to support APL keys via [https://linux.die.net/man/1/xmodmap xmodmap(1)] is possible, but not recommended — it has been superseded by the [https://wiki.archlinux.org/title/X_keyboard_extension X keyboard extension] (XKB). Generally <syntaxhighlight lang=console inline>xmodmap</syntaxhighlight> is best for simple tasks,<ref>ArchWiki Contributors. [https://wiki.archlinux.org/title/xmodmap xmodmap]. 19 July 2021</ref> which APL keyboards often tend not to be. [[Dyalog APL]], for example, has native support for XKB.<ref name="Dyalog APL XKB"/> | |||
For users who understand the pitfalls, an example <syntaxhighlight lang=console inline>~/.Xmodmap</syntaxhighlight> can be [https://gist.github.com/Russtopia/20ae5ab571d5bed73359ca956d9010a7 found at this GitHub Gist]. | |||
== XCompose (backtick/prefix/dead key) == | |||
With the [https://aplwiki.com/wiki/Typing_glyphs#Prefix_key prefix key] method, one key is assigned as a "dead key". When the dead key is pressed once, there is no output, but subsequent keypresses may produce a character. This is a common method for producing accented characters on certain keyboard layouts. | |||
The following GitHub gists define dead key sequences which produce APL characters using the standard APL key locations. | |||
* [https://gist.github.com/rikedyp/d5ef5a61b01b9d4227f358ea9dce5070 XComposeAPLBacktickUS] | |||
* [https://gist.github.com/rikedyp/24c946d281b799343c82946c2f5e6428 XComposeAPLBacktickUK] | |||
Save the contents of one of the above listed files as <syntaxhighlight lang=console inline>~/.XCompose</syntaxhighlight>. Changes should take effect the next time an application is started. | |||
== Troubleshooting == | == Troubleshooting == | ||
=== Gnome catches keystrokes before Dyalog === | |||
After upgrading Ubuntu 21.04 (Hirsute Hippo), Gnome catches the keystrokes from the <kbd>Super</kbd> key to show the list of applications, before Dyalog can receive it. [[#setxkbmap|Changing the shifting key]] from <syntaxhighlight lang=console inline>grp:win_switch</syntaxhighlight> to <syntaxhighlight lang=console inline>grp:caps_switch</syntaxhighlight> avoids the issue. Changing it to <syntaxhighlight lang=console inline>grp:rctrl_switch</syntaxhighlight> does not work. | |||
=== Dyalog Overrides Current Keyboard Settings === | === Dyalog Overrides Current Keyboard Settings === | ||
Prior to version 18.2, Dyalog APL would override the current [https://www.x.org/wiki/XKB/ XKB] configuration to use the Meta ("Windows") key as the modifier for entering APL symbols. If the user manages their keyboard configuration manually using the techniques described on this page, this behavior can be quite troublesome. | |||
To run Dyalog without overriding ("hijacking") the user keyboard configuration, run <code>dyalog</code> with the <code>nokbd</code> option: | To run Dyalog in the terminal without overriding ("hijacking") the user keyboard configuration, run <code>dyalog</code> with the <code>-nokbd</code> option: | ||
< | <syntaxhighlight lang=bash> | ||
dyalog -nokbd | dyalog -nokbd | ||
</ | </syntaxhighlight> | ||
The following script can be used to launch RIDE, immediately connecting a new Dyalog instance, without changing the xkb settings: | |||
<syntaxhighlight lang=bash> | |||
#!/usr/bin/env sh | |||
env RIDE_CONNECT=localhost:4502 ride & | |||
dyalog +s -q -nokbd RIDE_INIT=SERVE:*:4502 | |||
</syntaxhighlight> | |||
The keyboard layout changing is done by the file at <code>/opt/mdyalog/*/64/unicode/aplkeys.sh</code>, so changing it changes the behavior (clearing it entirely stops the automatic keyboard layout switching). Note that the file exists for each installed version and is reset on any update, so it may need to be modified multiple times. | |||
=== APL Keyboard Remains After Dyalog is Closed === | === APL Keyboard Remains After Dyalog is Closed === | ||
Dyalog | Previous versions of Dyalog override the current keyboard configuration, as described in [[#Dyalog_Overrides_Current_Keyboard_Settings|this section]], but even using the default keyboard configuration by starting Dyalog 18.2 or later with | ||
<syntaxhighlight lang=bash> | |||
dyalog --keyboard | |||
</syntaxhighlight> | |||
fails to return the user to their previous keyboard configuration on exit. To solve this, create a custom [[wikipedia:Bash_(Unix_shell)|Bash]] script to save and revert keyboard settings upon exiting Dyalog APL:<ref>Adám Brudzewsky. [https://stackoverflow.com/questions/63431922/dyalog-apl-hijack-windows-key-and-do-not-give-it-back-fedora-32-gnome-free-lic/63433845#63433845 Stack Overflow answer]. 17 Aug, 2020</ref> | |||
< | <syntaxhighlight lang=bash> | ||
#!/usr/bin/sh | #!/usr/bin/sh | ||
OLDLAYOUT=$(setxkbmap -query | sed -n 's/^layout://p') | OLDLAYOUT=$(setxkbmap -query | sed -n 's/^layout://p') | ||
| Line 163: | Line 279: | ||
OLDVARIANT=$(echo $OLDVARIANT | sed 's/^$/,/') | OLDVARIANT=$(echo $OLDVARIANT | sed 's/^$/,/') | ||
setxkbmap -layout $OLDLAYOUT -variant $OLDVARIANT -option -option $OLDOPTION | setxkbmap -layout $OLDLAYOUT -variant $OLDVARIANT -option -option $OLDOPTION | ||
</ | </syntaxhighlight> | ||
=== Settings reverted during X Windows session === | === Settings reverted during X Windows session === | ||
Since at least March 2020 there have been issues with < | Since at least March 2020 there have been issues with <syntaxhighlight lang=console inline>setxkbmap</syntaxhighlight> settings being reset without user instruction under the [[wikipedia:X Windows System|X Windows System]]. | ||
Below is a script written in [[wikipedia:Raku (programming language)|Raku]] that continuously checks for this undesirable reset behavior and puts the intended settings back in place.<ref>John Longwalker. [https://5ab5traction5.bearblog.dev/ 5ab5traction5 blog]. [https://5ab5traction5.bearblog.dev/apl-keyboard-keeper/ Raku to the Rescue: APL Keyboard Keeper]. 29 Jun, 2020</ref> | Below is a script written in [[wikipedia:Raku (programming language)|Raku]] that continuously checks for this undesirable reset behavior and puts the intended settings back in place.<ref>John Longwalker. [https://5ab5traction5.bearblog.dev/ 5ab5traction5 blog]. [https://5ab5traction5.bearblog.dev/apl-keyboard-keeper/ Raku to the Rescue: APL Keyboard Keeper]. 29 Jun, 2020</ref> | ||
< | <syntaxhighlight lang=perl6> | ||
#!/usr/bin/env raku | #!/usr/bin/env raku | ||
| Line 236: | Line 352: | ||
} | } | ||
} | } | ||
</ | </syntaxhighlight> | ||
== References == | == References == | ||
Latest revision as of 13:54, 6 February 2024
- This article is specific for Linux. For Hardware and other platforms, see Typing glyphs.
Since mid-2012, most Linux distributions with X11 and Wayland have Dyalog APL keyboard support included with the distribution,[1] using xkb, the X Keyboard Extension.[2]
setxkbmap
The simplest way to set up an APL keyboard on Linux is with the following setxkbmap command. Enter the following in your terminal emulator of choice:
setxkbmap -layout us,apl -variant ,dyalog -option grp:switch
An explanation:
-layout us,aplassignsus(U.S. English) to be the primary layout, whereasaplis secondary
-option grp:switchassigns Right Alt to switch to the secondaryapllayout when it is pressed, otherwiseusis used
-variant ,dyalogassigns the Dyalog APL variant to theapllayout which contains modifiations unique to the Dyalog language (Note the preceding comma)
A full list of keys that can be used to switch layouts is included in /usr/share/X11/xkb/rules/evdev.lst under the option category.
Note:
- These changes are not permanent; the user will have to select one of a myriad of methods to run the command on startup. Alternatively, if they use one of the desktop environments listed below, they can follow those instructions.
- If you want to specify a different language, say for United Kingdom, specify
gbinstead ofus(notuk)
- If you want to specify a different layout, dvorak, bepo, etc, change the variant flag to
dvorak,dyalog.
NixOS
Adding these entries to /etc/nixos/configuration.nix will setup xkbmap to work correctly after the next time you build your configuration (usually with nixos-rebuild switch).
  services.xserver = {
    layout = "cn,apl";
    xkbVariant = ",dyalog";
    xkbOptions = "grp:switch";
  };
libinput
X11 and Wayland use XKB rules to determine their layout. To set a layout create a file called 00-keyboard.conf at /etc/X11/xorg.conf.d or /usr/etc/X11/corg.conf.d, ensuring you have permissions, and edit it to:
Section "InputClass"
        Identifier "system-keyboard"
        MatchIsKeyboard "on"
        Option "XkbLayout" "us,apl"
        Option "XkbVariant" ",dyalog"
        Option "XkbOptions" "grp:switch"
EndSection
The options "us,apl", ",dyalog", and "grp:switch" are the same as in setxkbmap and can be changed to better suit your environment.
Once saved this will affect any future session. To change the current session and test out layouts, use setxkbmap.
GNOME
GUI
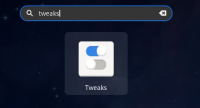
- Open the Activities menu; this is located in the top-left corner of a default GNOME 3 session (alternatively, use your Super key to open the Activities overlay):

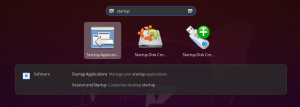
- Search for "startup." When the Startup Applications program is highlighted, press the Enter key to open it:
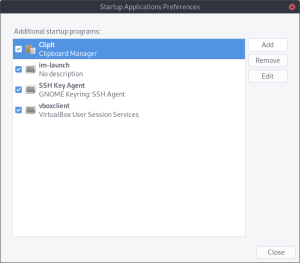
- Select the Add button on the right-hand side:
- Provide a name, enter your
setxkbmapcommand, and click Add when finished: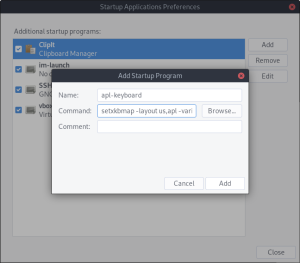
Terminal
- Navigate to
~/.config/autostartand create a.desktopwith any name that will help you remember its function. - Add the following to the contents of your file, customizing to suit your needs:
[Desktop Entry]
Type=Application
Exec=setxkbmap -layout us,apl -variant ,dyalog -option grp:switch
Hidden=false
NoDisplay=false
X-GNOME-Autostart-enabled=true
Name[en_US]=apl-keyboard
Name=apl-keyboard
Comment[en_US]=
Comment=
LXDE
- Prepend an
@to thesetxkbmapcommand from above:@setxkbmap -layout us,apl -variant ,dyalog -option grp:switch
- Add it as a line in your user's LXDE
autostartfile, located at:~/.config/lxsession/LXDE/autostart
For Lubuntu versions up to and including 18.04 (before the LXQt split), the location of autostart is ~/.config/lxsession/Lubuntu/autostart.
LXQt
GUI
- From your LXQt panel, navigate to Preferences → LXQt Settings → Session Settings; alternatively, enter
lxqt-config-sessionin your terminal emulator. You will be greeted with the following window: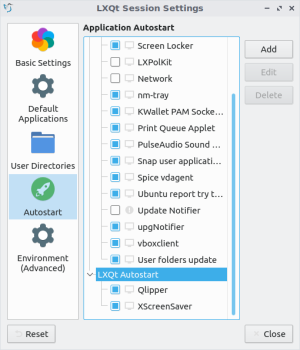
- Select the
LXQt Autostartdropdown (it will be highlighted as shown above) and click the Add button to display the following pop-up window: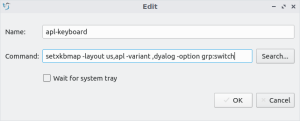
- Provide a name, enter your
setxkbmapcommand, and click OK when finished.
Terminal
The above GUI approach merely creates a .desktop file in the user's ~/.config/autostart. Create your own file in the autostart directory whose contents are as follows, to replicate the functionality achieved through the GUI:
[Desktop Entry]
Exec=setxkbmap -layout us,apl -variant ,dyalog -option grp:switch
Name=apl-keyboard
OnlyShowIn=LXQt;
Type=Application
Version=1.0
MATE
GUI
- Open your MATE menu (in the top-left corner of a default environment) and select Control Center at the bottom of the window:
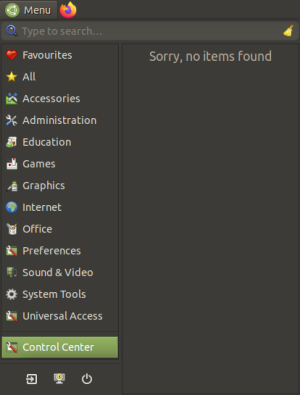
- Scroll down through the main window, and under the Personal category, select Startup Applications:
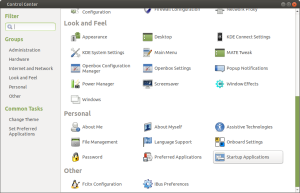
- Click the Add button on the right-hand side:
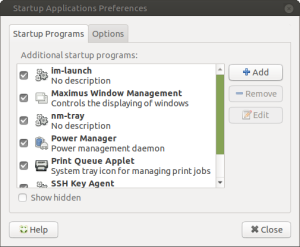
- Provide a name, enter your
setxkbmapcommand, and click Add when finished: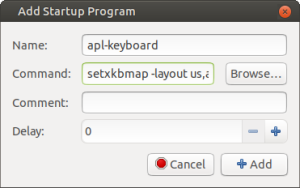
Terminal
Navigate to ~/.config/autostart and create a .desktop with any name that will help you remember its function.
Add the following to the contents of your file, customizing to suit your needs:
[Desktop Entry]
Type=Application
Exec=setxkbmap -layout us,apl -variant ,dyalog -option grp:switch
Hidden=false
X-MATE-Autostart-enabled=true
Name[en_US]=apl-keyboard
Name=apl-keyboard
Comment[en_US]=
Comment=
X-MATE-Autostart-Delay=0
Wayland
Currently, Wayland uses XKB for keyboards, but they are not modifiable during runtime using e.g. setxkbmap by default. The keyboard layout must be configured and then the session restarted.
Raspberry Pi "Bookworm" onwards
Raspbian OS has moved to its own Wayland-based desktop environment "LXDE-pi-wayfire" in Bookworm.
You can check that this is your currently running environment by inspecting the DESKTOP_SESSION environment variable.
echo $DESKTOP_SESSION
The current user can modify their keyboard configuration using XKB options by editing the file ~/.config/wayfire.ini. These options take effect while using the graphical desktop environment.
Under the [input] section, set
xkb_layout = gb,apl
xkb_options = grp:lswitch
to use the UK keyboard layout with a Left Alt APL shifting key. See the section on setxkbmap for more information about XKB keyboard configuration.
To set the keyboard configuration for use in the terminal console outside of the Wayland GUI, modify /etc/default/keyboard to include:
XKBLAYOUT="gb,apl"
XKBOPTIONS="grp:switch"
GNOME Tweaks
The Tweaks tool allows configuration beyond the defaults enabled in GNOME.
- Install GNOME Tweaks using apt or dnf, or by searching your distribution's Software Center.
- Start GNOME Tweaks by either:
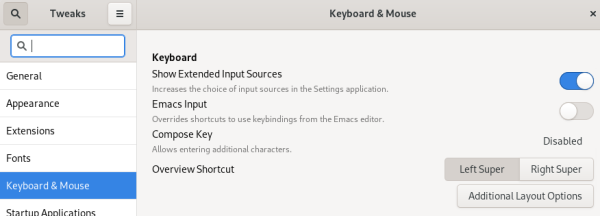
- Open Keyboard & Mouse Panel and enable "Show Extended Input Sources"
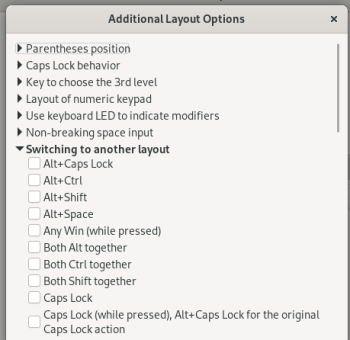
- Open the Additional Layout Options and tick one or more of the options under "Switching to another layout"
- Go to Settings → Region & Language → Add a new input source. Both English (United Kingdom) and English (United States) will have several APL layout options to choose from.
- Restart the session (for example, by logging out and logging in again).
Xfce
Xfce's GUI (Settings Manager → Keyboard → Layout) is unable to set up an APL-compatible keyboard. Therefore, we must do it ourselves.
Xfce ships with a utility, xfconf-query, which allows you to manage Xfce's XML configuration files on the command line. Enter the following commands into your terminal:
xfconf-query -c keyboard-layout -n -p '/Default/XkbDisable' -t 'bool' -s 'false'
This enables XKB, allowing us to manage our keyboard layout.
xfconf-query -c keyboard-layout -n -p '/Default/XkbLayout' -t 'string' -s 'us,apl'
Defines the keyboard layout itself. The comma-delimited apl specifies a second layout group. Make sure you replace us with the code for your language; a list of these can be found in /usr/share/X11/xkb/rules/evdev.lst, under the layout category.
xfconf-query -c keyboard-layout -n -p '/Default/XkbOptions/Group' -t 'string' -s 'grp:win_switch'
This tells Xfce to switch to the APL layout only when the Windows key is pressed. When the Windows key is released, the layout will return to its previous setting. This is incredibly useful as the apl layouts in XKB do not support Space, Enter, or the arrow keys (among basically all the others). A full list of possible keys for switching between keyboard groups is located in /usr/share/X11/xkb/rules/evdev.lst, under the option category.
xfconf-query -c keyboard-layout -n -p '/Default/XkbVariant' -t 'string' -s ',dyalog'
Specifies that the variant applies to the second layout, apl, due to the preceding comma. The dyalog variant is unique to Dyalog.
And you're done! Try holding down the Windows key and pressing H on your keyboard — you should see a ∆.
xmodmap
Modifying the Linux keyboard to support APL keys via xmodmap(1) is possible, but not recommended — it has been superseded by the X keyboard extension (XKB). Generally xmodmap is best for simple tasks,[3] which APL keyboards often tend not to be. Dyalog APL, for example, has native support for XKB.[2]
For users who understand the pitfalls, an example ~/.Xmodmap can be found at this GitHub Gist.
XCompose (backtick/prefix/dead key)
With the prefix key method, one key is assigned as a "dead key". When the dead key is pressed once, there is no output, but subsequent keypresses may produce a character. This is a common method for producing accented characters on certain keyboard layouts.
The following GitHub gists define dead key sequences which produce APL characters using the standard APL key locations.
Save the contents of one of the above listed files as ~/.XCompose. Changes should take effect the next time an application is started.
Troubleshooting
Gnome catches keystrokes before Dyalog
After upgrading Ubuntu 21.04 (Hirsute Hippo), Gnome catches the keystrokes from the Super key to show the list of applications, before Dyalog can receive it. Changing the shifting key from grp:win_switch to grp:caps_switch avoids the issue. Changing it to grp:rctrl_switch does not work.
Dyalog Overrides Current Keyboard Settings
Prior to version 18.2, Dyalog APL would override the current XKB configuration to use the Meta ("Windows") key as the modifier for entering APL symbols. If the user manages their keyboard configuration manually using the techniques described on this page, this behavior can be quite troublesome.
To run Dyalog in the terminal without overriding ("hijacking") the user keyboard configuration, run dyalog with the -nokbd option:
dyalog -nokbd
The following script can be used to launch RIDE, immediately connecting a new Dyalog instance, without changing the xkb settings:
#!/usr/bin/env sh
env RIDE_CONNECT=localhost:4502 ride &
dyalog +s -q -nokbd RIDE_INIT=SERVE:*:4502
The keyboard layout changing is done by the file at /opt/mdyalog/*/64/unicode/aplkeys.sh, so changing it changes the behavior (clearing it entirely stops the automatic keyboard layout switching). Note that the file exists for each installed version and is reset on any update, so it may need to be modified multiple times.
APL Keyboard Remains After Dyalog is Closed
Previous versions of Dyalog override the current keyboard configuration, as described in this section, but even using the default keyboard configuration by starting Dyalog 18.2 or later with
dyalog --keyboard
fails to return the user to their previous keyboard configuration on exit. To solve this, create a custom Bash script to save and revert keyboard settings upon exiting Dyalog APL:[4]
#!/usr/bin/sh
OLDLAYOUT=$(setxkbmap -query | sed -n 's/^layout://p')
OLDVARIANT=$(setxkbmap -query | sed -n 's/^variant://p')
OLDOPTION=$(setxkbmap -query | sed -n 's/^options://p')
dyalog
OLDLAYOUT=$(echo $OLDLAYOUT | sed 's/^$/,/')
OLDVARIANT=$(echo $OLDVARIANT | sed 's/^$/,/')
setxkbmap -layout $OLDLAYOUT -variant $OLDVARIANT -option -option $OLDOPTION
Settings reverted during X Windows session
Since at least March 2020 there have been issues with setxkbmap settings being reset without user instruction under the X Windows System.
Below is a script written in Raku that continuously checks for this undesirable reset behavior and puts the intended settings back in place.[5]
#!/usr/bin/env raku

# Small script to ensure that APL keyboard layout is still set in xkb settings.
# Note that this is a patch for some sort of deranged time-based reset of these
# settings that is happening at a lower level of the Xorg-based Linux user experience.
#
# It's not clear what is causing these resets but this script allows us to more
# or less not care about it and get on with our hacking.
#
# Released under Artistic License by John Longwalker 2020

my $total-checks = 0;
sub xkbmap-contains-apl() {
  $total-checks++;
  so qx{ setxkbmap -query | grep '^layout:.*\<apl\>' }; # shell-out is easy as usual in a Perl
}

my $total-resets = 0;
sub set-xkbmap-for-apl($key, $verbose) {
  say "Reset total is now {++$total-resets} -- {DateTime.now}"
  	if $verbose;
  my $xkb-settings = chomp qx{ setxkbmap -query };

  my ($layout, $variant, $options);
  if $xkb-settings ~~ /^^ "layout:" \s* $<layout>=(<.graph>*) $$/ {
  	$layout = $<layout>.Str;
  } else {
  	die "Aborting. The xkb settings do not specify any layout:\n$xkb-settings";
  }

  if $xkb-settings ~~ /^^ "variant:" \s* $<variant>=(<.graph>*) $$/ {
  	$variant = $<variant>.Str;
  }

  if $xkb-settings ~~ /^^ "options:" \s* $<options>=(<.graph>*) $$/ {
  	$options = $<options>.Str;
  }

  $layout  = ($layout, 'apl').join(',');
  $variant = $variant ?? ($variant, 'dyalog')
                      !! 'dyalog';
  $options = $options ?? ($options, "grp:$key").join(',')
                      !! "grp:$key";
  my $invocation = "setxkbmap -layout $layout -variant $variant -option $options";
  say "Invocation: $invocation"
    if $verbose;
  qqx{ $invocation };
}

# You can use --interval, --key, and -v/--verbose on the command line.
sub MAIN(:$interval = 30, :$key = 'switch', :v($verbose) = False) {
  react {
    whenever Supply.interval($interval) {
      set-xkbmap-for-apl($key, $verbose)
        if not xkbmap-contains-apl;
    }

    whenever signal(SIGINT) {
      say "Reset a total of $total-resets out of $total-checks checks"
      	if $verbose;
      exit;
    }
  }
}
References
- ↑ Dyalog Forums. Keyboard setup on Linux. Sep 21, 2010.
- ↑ 2.0 2.1 Geoff Streeter. Supporting APL keyboards on Linux. Dyalog '10.
- ↑ ArchWiki Contributors. xmodmap. 19 July 2021
- ↑ Adám Brudzewsky. Stack Overflow answer. 17 Aug, 2020
- ↑ John Longwalker. 5ab5traction5 blog. Raku to the Rescue: APL Keyboard Keeper. 29 Jun, 2020
| APL development [edit] | |
|---|---|
| Interface | Session ∙ Typing glyphs (on Linux) ∙ Fonts ∙ Text editors |
| Publications | Introductions ∙ Learning resources ∙ Simple examples ∙ Advanced examples ∙ Mnemonics ∙ ISO 8485:1989 ∙ ISO/IEC 13751:2001 ∙ A Dictionary of APL ∙ Case studies ∙ Documentation suites ∙ Books ∙ Papers ∙ Videos ∙ APL Quote Quad ∙ Vector journal ∙ Terminology (Chinese, German) ∙ Neural networks ∙ Error trapping with Dyalog APL (in forms) |
| Sharing code | Backwards compatibility ∙ APLcart ∙ APLTree ∙ APL-Cation ∙ Dfns workspace ∙ Tatin ∙ Cider |
| Implementation | Resources ∙ Open-source ∙ Magic function ∙ Performance ∙ APL hardware |
| Developers | Timeline of corporations ∙ APL2000 ∙ Dyalog ∙ IBM ∙ IPSA ∙ STSC |
| APL glyphs [edit] | |
|---|---|
| Information | Glyph ∙ Typing glyphs (on Linux) ∙ Unicode ∙ Fonts ∙ Mnemonics ∙ Overstrikes ∙ Migration level |
| Individual glyphs | Jot (∘) ∙ Right Shoe (⊃) ∙ Up Arrow (↑) ∙ Zilde (⍬) ∙ High minus (¯) ∙ Dot (.) ∙ Del (∇)
|
